Few weeks ago I had to implement Microsoft Exchange Online for a customer who didn’t used Exchange in the past. For a simple user management, I decided to install and configure Azure AD Connect. So the user accounts from local Active Directory will be synchronized to Azure AD.
There are several advantages of this scenario:
- you have a single point for user management, your local Active Directory
- if configured, user passwords (or better to say password hash values) are automatically synchronized to Azure AD
- the user has a Single-Sign-On Experience for Office 365 services
- Office 365 license assignment based on local AD groups
After setting up Azure AD Connect and enabling all users for Exchange Online, I started to configure some Exchange settings: configure distribution lists, shared mailboxes and second mail addresses. But wait, what’s that? After submitting the change and error message pops-up:
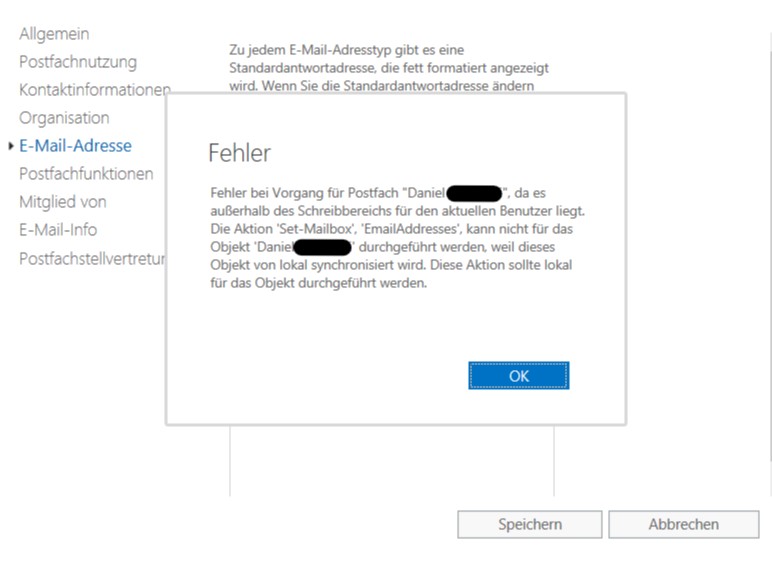
What da hack? After some research in the web and reading several blog entries, it was clear: When using AAD Connect and synchronized accounts in Office 365, you have to install an on-premises Exchange Management server for changing some Exchange Online settings. Even you don’t have an on-premises Exchange server installed yet. Very disappointing and frustating. That’s why a customer decides to use cloud service: they wan’t have to install and maintain the system on-premises.
The supported way by Microsoft
First, you have to install a new Exchange Server in your infrastructure. If you don’t have a valid Exchange Server license, no problem. Use the Exchange Hybrid Wizard from Microsoft. It detects the missing license and will install an Exchange Hybrid license.
With the Exchange Hybrid license you are allowed to use the Exchange Server for hybrid purposes. But caution: some blogger reporting the new Exchange Server 2019 actually doesn’t support the Hybrid license key. So, please install Exchange Server 2016 in an actual version.
After the installation and licensing is done, configure an appropriate Exchange Mail Address policy, so new created mailboxes get a correct mail address.
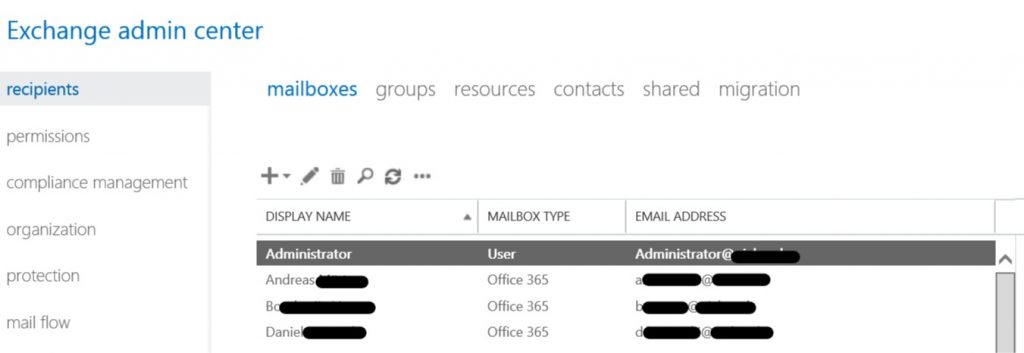
Next step is to add your Office 365 enabled mailboxes to the local Exchange admin center. To do this, open a Microsoft Exchange Management Shell and use the following cmdlet:
Enable-RemoteMailbox "Kim Akers" -RemoteRoutingAddress "kima@contoso.mail.onmicrosoft.com"
After this, the mailbox should be visible in your on-premises Exchange Admin Center and you can manage them:
The unsupported way
Some blogger talking about using ADSI Edit to add further mail addresses for a user for example. But this is not supported by Microsoft.
Links
- Microsoft Technet Blog “Hybrid Configuration Wizard and licensing of your on-premises server used for hybrid“
- Microsoft Ignite “THR2145 – Why do we need to keep an Exchange Server on-premises when we move to the cloud?“
- Installing Exchange Server 2016 in an upgraded domain based on SBS Server 2011