
A few weeks ago, Microsoft announced a new milestone for the Microsoft Teams phone system – the Microsoft Teams SIP gateway will support IP DECT systems soon. A few vendors are already known and one of them will be Poly and their IP DECT solution Rove. In this blog post, I will write about the configuration and how to setup the Poly Rove to work together with the Microsoft Teams SIP gateway.
Poly Rove – an overview
Poly entered the IP DECT market with their product suite Rove in 2021. It is an IP based DECT system and can handle up to 254 base stations and 1.000 handsets. Poly advertises their handsets with built-in Microban antimicrobial protection. Furthermore, both handset models are IP65 certified and thus particularly durable. You can find a link to the Poly Rove series at the end of this blog article for more details.
Microsoft Teams SIP Gateway
The Microsoft Teams SIP Gateway was released in November 2021 and let’s connect your native SIP devices to the Microsoft Teams platform. In the beginning, only certified IP desk phones from the well know Skype for Business Online decade and special Cisco devices were supported. But now, Microsoft makes the next import step and opens the platform for IP DECT systems, too.
Spectralink, Ascom and Poly are the first certified vendors for the Microsoft Teams SIP gateway.
At the end of this blog, you will find further information about the Microsoft Teams SIP gateway.
Requirements
You need the following prerequisites to set up Poly Rove with Microsoft Teams:
- The Microsoft SIP gateway is enabled in your tenant
- a valid Microsoft Teams Phone system user with license and phone number
- Poly Rove B2 or B4 base station
- Poly Rove 30/40 DECT handset
- the base station and the handset require firmware > 8.0.3
- handsets are connected to the DECT base station
Configure the Microsoft Teams SIP gateway
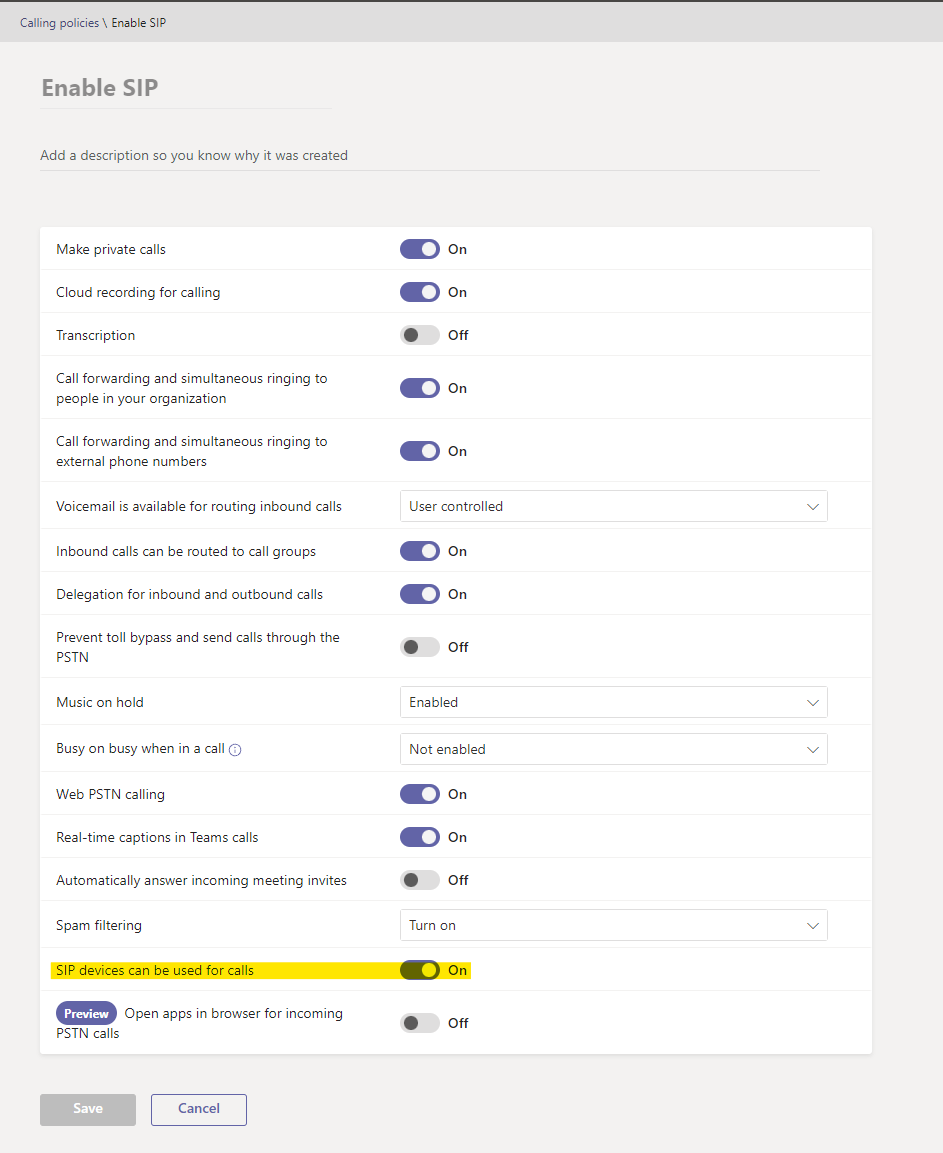
As always, activating the Microsoft Teams SIP Gateway is simple. Open the Microsoft Teams Admin Center, go to Voice and open the Calling Policies section.

You can enable the SIP support in the Global Calling Policy or create a new Calling Policy and assign it to dedicated users only. It depends on your business needs and if you like to allow all your users to register IP Desk phones and IP DECT base stations or if you like to have more control over this feature.
Setup the Poly Rove IP DECT system
Before you can start to register the first Microsoft Teams user to a DECT handset, you must configure the base station and the firmware needs to be updated of the DECT base system and the handset.
Firmware update
Let’s start with the firmware update. The base station and the handset need at least firmware version 8.0.3 to work with Microsoft Teams. Thus, you should configure the auto provisioning service first.
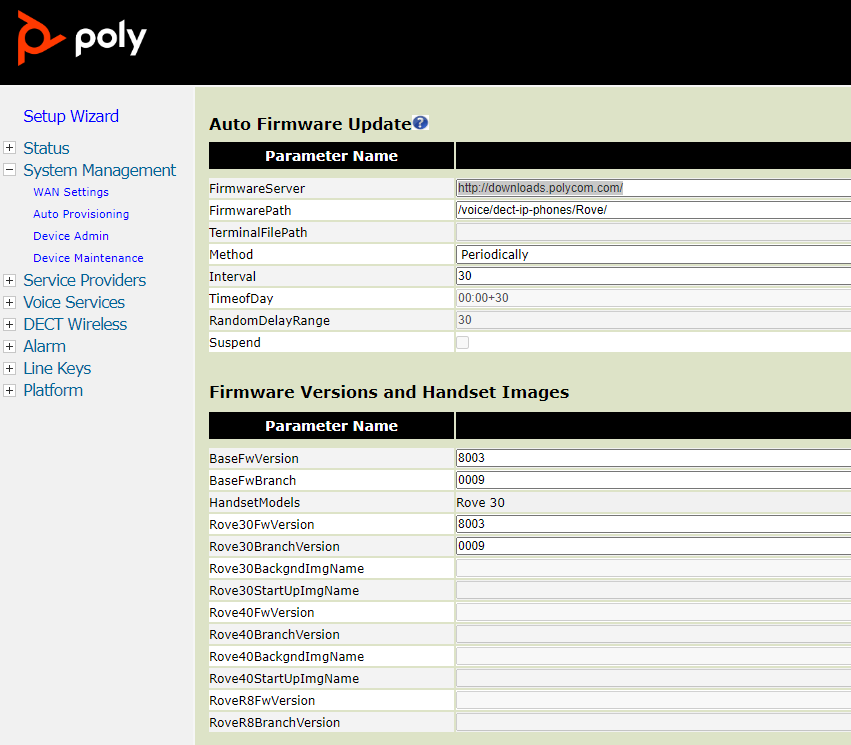
When you log into the Poly DECT base sender for the first time (default login name for the Rove Web Admin page is admin and the default password is admin), you need to change the password. Then, you can start to configure the auto firmware update settings. In the Admin page, go to System Management -> Auto provisioning. Here, you need to change the following parameter:
Auto Firmware Update
| Parameter name | Value |
| FirmwareServer | http://downloads.polycom.com/ |
| FirmwarePath | /voice/dect-ip-phones/Rove/ |
| Method | Periodically |
| Interval | 30 |
Firmware Versions and Handset Images
| Parameter name | Value |
| BaseFWVersion | 8003 |
| BaseFwBranch | 0009 |
| Rove30FwVersion | 8003 |
| Rove30FwBranch | 0009 |
| Rove40FwVersion | 8003 |
| Rove40FwBranch | 0009 |
Configuration of the Poly Rove IP DECT system
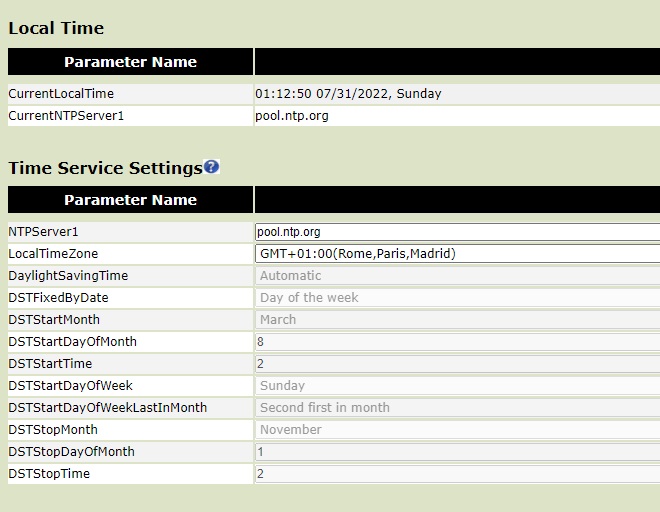
Generally, the configuration of the base station is quite simple. All you need to configure is the correct time zone and customize the NTP service if required. These settings can be found in the System Management -> WAN settings
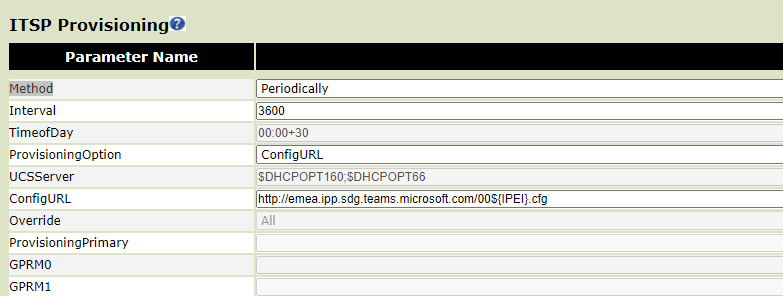
And of course, you need to define the Microsoft SIP provisioning service as configuration server for the DECT handsets. To do this, open to the Auto Provisioning page of the DECT base system and configure the ITSP Provisioning section:
| Parameter name | value |
| Method | Periodically |
| Interval | 3600 |
| ProvisioningOption | ConfigURL |
| ConfigURL | depending on your location: http://noam.ipp.sdg.teams.microsoft.com/00${IPEI}.cfg http://emea.ipp.sdg.teams.microsoft.com/00${IPEI}.cfg http://apac.ipp.sdg.teams.microsoft.com/00${IPEI}.cfg |
Please note that the Poly Rove DECT server will now reboot several times and handsets will lose their connectivity. In my lab, the DECT server rebootet three times before it was configured for the Microsoft Teams SIP gateway connection.
Register the handset for a Microsoft Teams user
If the handset is not registered already, select an available slot in the Specific Handsets section, and click on Register. On the handset, open the settings -> connectivity and choose Register. Next, select an entry on the handset and put in the DECT registration code (by default 0000). The handset should be registered now.


Please be aware of the firmware version of the handset. It is at least 8.0.3 required. You can easily check the firmware version of the handset in the DECT Summary page of the base server itself.
Provisioning the device in the Teams Admin Center
Next, you need to add the device to Microsoft Teams Admin Center and generate a provisioning code. Open the Teams Admin Center and go to Teams devices -> Phones. Click on the upper right corner Action -> Provision devices.
You can add a single device or upload multiple devices by a CSV file. Please note, that you must add the IPEI number of the handset plus “00” as a prefix. And not the MAC address of the base station.
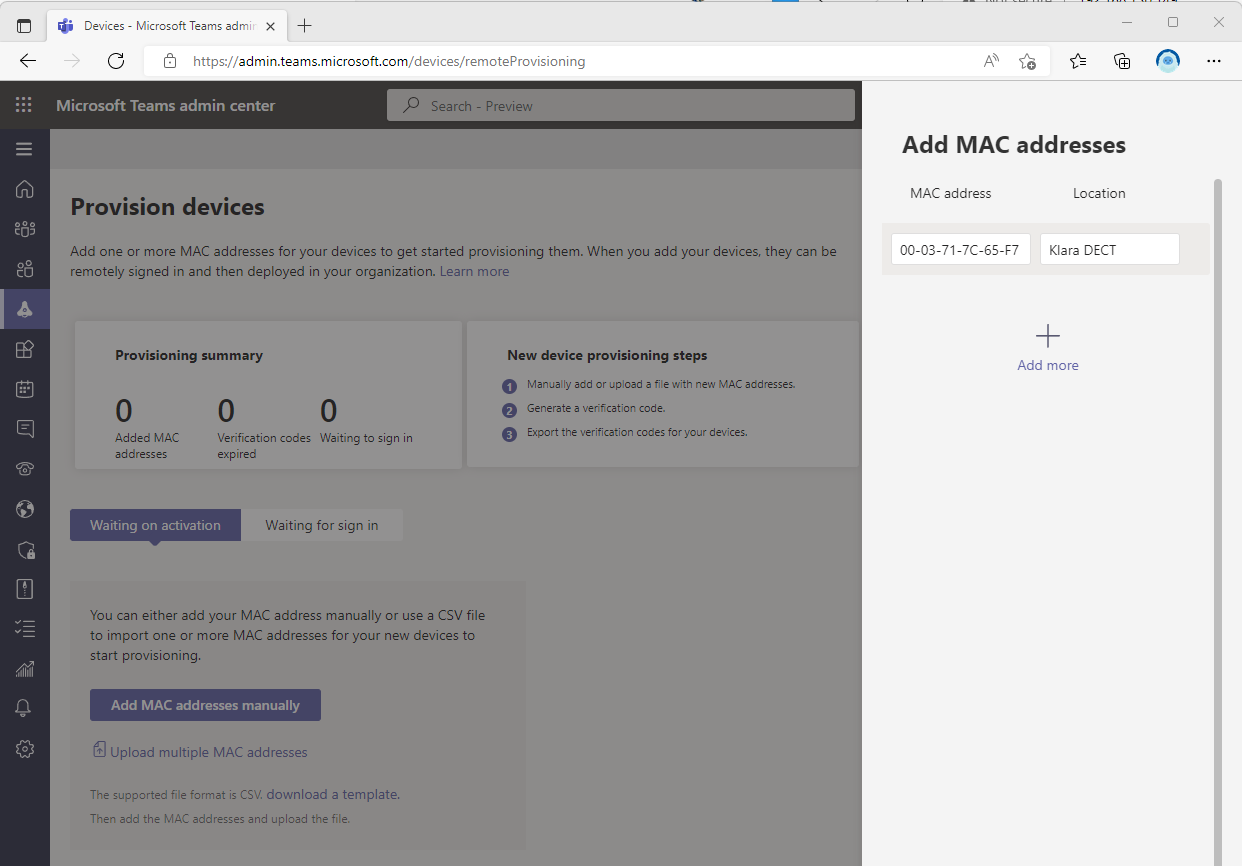
Afterwards, you must generate a verification code in the Admin Center. The code is valid for 24 hours.

Now, dial *55*<verification code> on the handset. You should hear three busy tones. With a little bit of luck, the handset display is showing “Sign in” and the list entry in the TAC moves from the “Waiting on activation”-tab to the “Waiting for sign in”-tab.

Register a Teams user
Now it’s time so sign in the user to the DECT handset.
Select the newly added device in Teams Admin Center and click on Sign in a user. It will pop up a new window and generates the Teams provision code for login of the handset.
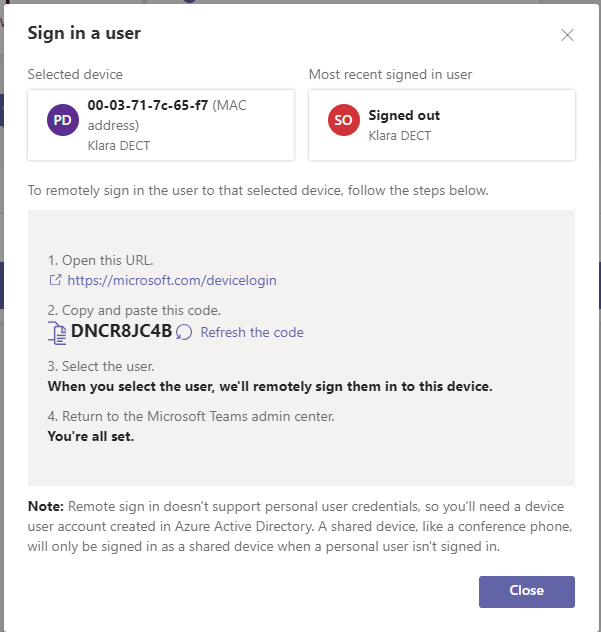
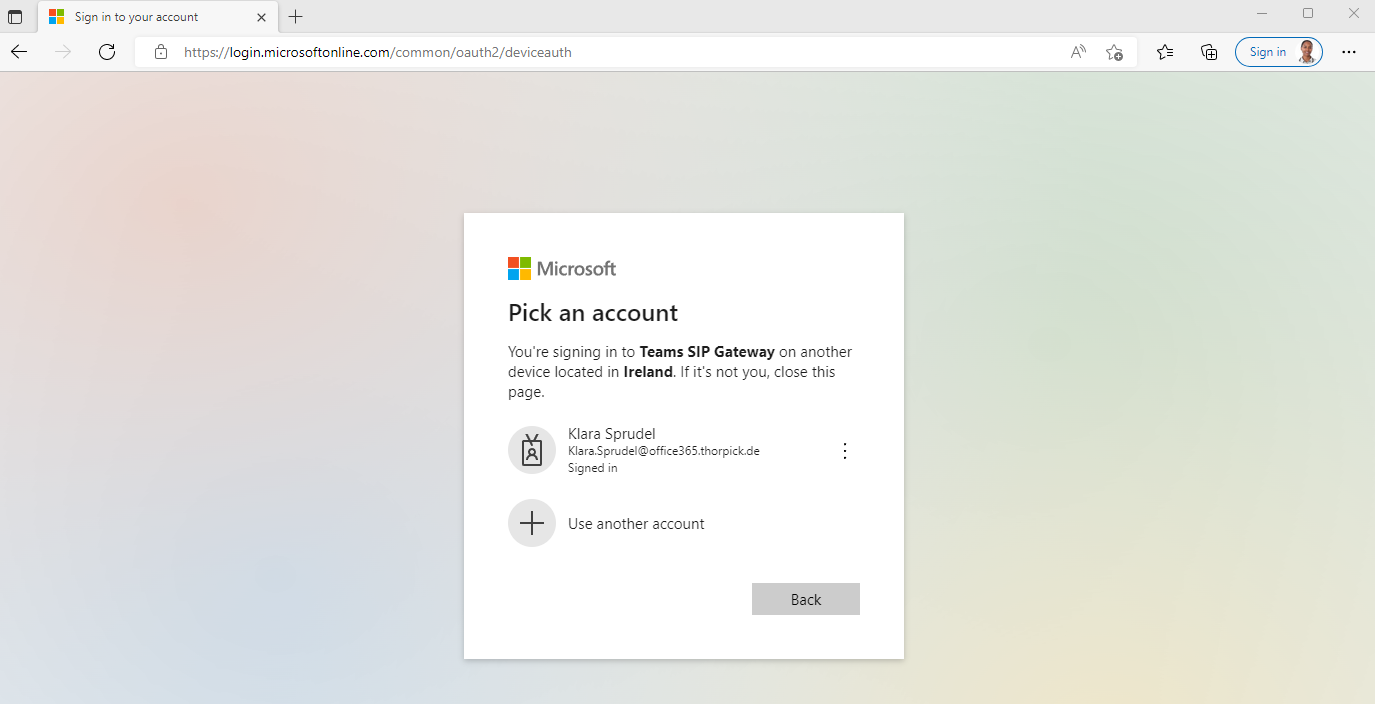
Send the device login URL and the code to the user who should register the DET handset. Advise the user to open the browser, open the URL and sign in with the Office 365 account. Next, the user must enter the generated code and can pick the correct account. The final step is to approve the sign in by Teams SIP gateway.
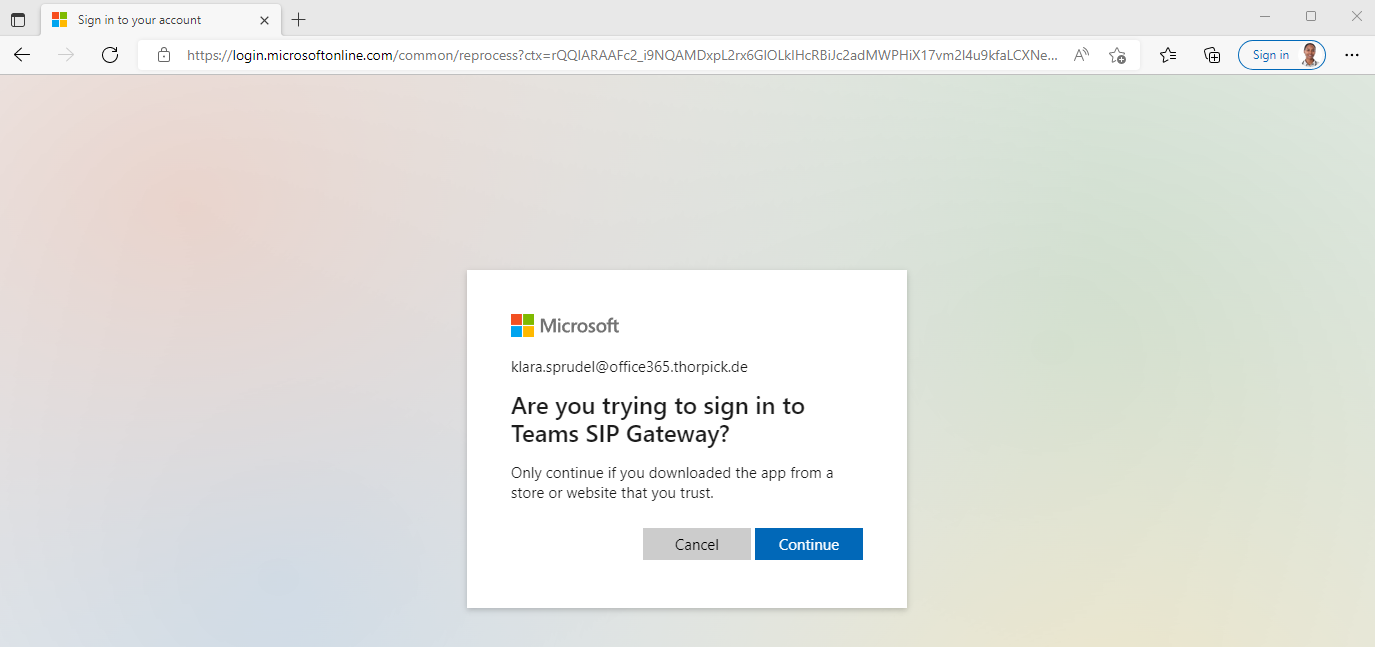
That’s it. The web browser session can be closed now. In my lab, the Rove DECT server rebooted once. After the reboot, the DECT handset is registered at Microsoft Teams SIP gateway and it’s showing the phone number on the display.
Conclusion
In case of the Poly solution, some things are still missing and could be improved. From my tests, the DECT server rebooted when a Teams user registered a handset. For smaller environments that’s ok, for large deployments this is not acceptable.
Also, the localization of the handsets could be improved. Even I’ve selected German as display language, the phone displays the time in the 12-clock format. I didn’t find any setting to configure it for a 24-clock format.
The DECT server offers an option for a central directory and supports Local, LDAP and XSI Server. I will check and validate, if the handset supports LDAP when connected to Teams and if you can connect it to Azure AD. Currently I couldn’t find a way to search for other Teams users on the DECT handset.
The setup and implementation are quite easy and straight forward.
It’s a major step for each customer who would like to replace their legacy PBX system or even Lync/Skype for Business Enterprise Voice deployment by Microsoft Teams, that IP DECT systems was not supported in the past. That has been changed now.
Links
My session about Microsoft Teams SIP gateway at Commsverse 2022
Great Article !
Were you able to find out if LDAP ( directory search ) ?
Brilliant article! Thanks enormously for posting!
For your info we got the LDAP working. Our organisation, like many others, uses on-premises Active Directory synchronised to the cloud. The LDAP query is directed at our on-prem Domain Controller.
Thank you very much for reading my blog and for your feedback. I appreciate it.
Is it possible to setup the ConfigURL using a DHCP option? It’d be great if we didn’t have to login to the web-portal.
Hi David, Poly Rove DECT IP phones extract DHCP Option 160 and 66 from a DHCP offer by default and will prioritize ahead of other options in the ConfigURL parameter.